 The Specifications Master Table Of Contents [TOC] is a handy tool for other things than writing the project specifications. I find that it is always informative to review the master list of specifications while thinking about the building that you are designing.
For instance, during the latter part of Schematic Design, if you review the Specifications Master TOC, you will almost certainly see several things that you have not incorporated into your thinking about the building yet. Some, like finishes, are not critical at this stage. But seeing Overhead Doors in the TOC might remind you of waste removal or package deliveries that would require an overhead door. Another example: seeing Decorative Concrete Paving might make you realize that you should consider its use - before Construction Documents are 80% complete. There are just too many things to consider to be certain that you have a complete concept. Using the Specifications Master TOC as a checklist late in Schematic Design, halfway through Design Development and about 20% into Construction Documents will give you fewer things to rework in the final days of design and they will be better integrated. You are also starting the spec-writing process by using the Specifications Master TOC in this way. We took our Specifications Master TOC from our spec-writing software, SpecLink+, and first deleted all the spec sections that we never use and added Division 0 documents that we preferred. Next we color-coded the remaining specification titles to indicate if our master of the spec is "ready-to-use as-is" (black), "needs a quick review" (green), "needs editing" (brown), or "never been edited" (red). The difference between the last two categories is that "needs editing" means to customize the spec for this project, while "never been edited" means you will need to spend extra time making decisions about the products and methods covered in the spec. A copy of this master table of contents would be renamed with the project name and during each review the section names that we decided not to use were struck-through. Late in Construction Documents these sections would be completely deleted, but not before we were sure that they would not be used. As the specs were actually written, we changed the color to blue, and when ready to print, we changed the color to black. The Specifications Master TOC became a process checklist and ultimately was printed as the Table Of Contents of the Specifications for the project. Hopefully there is something about our methodology that will help you make your method better. Our Master TOC is downloadable here.  Submitting a cover letter with your plans for the permit application may be common practice. In some jurisdictions a letter like this may even be required. Nevertheless we have found that a cover letter sets a professional tone and gives you a way to open a dialog about the review process.
We like to handle the permit submission because leaving it up to the contractor, while easier, is also full of opportunities to look bad in your client's eyes - news of mistakes and extra costs coming from the contractor rather than you. If you submit for the permits, the outcomes may not be significantly different, but the perception of your service will be. We cover the following issues in the letter.
As follow-up, we check back frequently to determine which plan examiner will be reviewing the plans. Once we know who the examiner is, we contact him directly and review the background on the project to make sure he is aware of it. The jurisdictions with which we are most familiar will estimate the timeframe for completing the review. This is helpful information to convey to the Owner and Contractor, if he is on-board already. Normally we plan the submittal of the plans for permits to precede or coincide with issuing the plans for bidding. The goal is to obtain information on any code correction issues before bids are received so that an addendum can be issued that includes any changes in the project. Once bids are received, pricing a change like this by change order increases the cost of the change more because of the lack of competition. Our experience is that there is always a code issue or two. So if you wait until after bids are in to receive the results of the plan review, then your time will have to be spent processing the necessary change order. This actually takes about the same time as managing the process as described here. But it gives a better perception of your services, and it speeds up the start-up of construction. Download a sample letter.  Lucidchart Diagramming Lucidchart Diagramming Lucidchart is a Google Chrome browser App for making diagrams, flow charts, organizational charts and similar tasks. You work on a 'paper' workspace in your choice of size and while you can make elements a specific size for a to-scale drawing; that seems like a good way to drive yourself crazy. I have used Lucidchart to make flow charts of work processes. This helps you think the process through as well as give you sharable documentation. I have also used it to layout a web page idea to share with others and to show to the website designer. Because of how easy it is to move elements around, it would be very useful to use for Site Analysis or Schematic Design bubble diagrams when you are just trying to get relationships worked out.  Web Page Example Web Page Example Lucidchart is a very handy tool for the occasional diagram. The learning curve is just minutes. The output is PDF, PNG, JPEG, VDX (Visio) or you can save it to Google Drive in its native format. The integration with Google Drive is nice but storing your files in folders in the Lucidchart cloud works fine too.
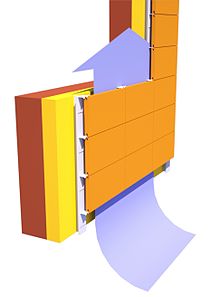
There is a free version that allows 60 elements per chart. I have exceeded this limit a few times and then realized that I didn't need all the elements that I had. So generally the limit for the free version is not a handicap. The paid versions are not very expensive when paid annually: Basic - $3.33/mo for 100 Mb storage, Pro - $8.33/mo for 1 Gb storage, and Team - $21/mo for 5 Gb. See the subscription levels and features. Even if you don't use the free Google Chrome for your browser, it is worth getting it just for Lucidchart. To get Lucidchart go to the Google Web Store from a blank tab or window, search for Lucidchart, sign up so you can save your work, and you are ready to roll. 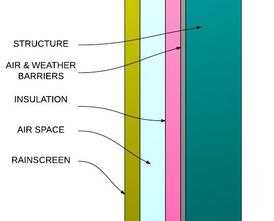 This is a quick overview of the RainScreen concept. Concept In a rainscreen design the exterior surface of the wall is not considered a weather barrier as in most traditional wall systems. Think of wood siding; nothing is intended to get past the siding. In a rainscreen wall, most water is kept out but not necessarily all water. Any water that makes it through the screen is conducted down through the air space and back to the exterior. The archetypal example is a masonry cavity wall. Rather than just one line of defense, the rainscreen provides two lines of defense and the critical second line of defense is subject to only a fraction of the rain water, and it is not wind-driven by the time it reaches the inner barrier. Components
CONCLUSION A rainscreen wall is becoming the expected, modern solution to exterior walls. The benefits outweigh the disadvantages. Where budgets allow and capable workmen can be counted on to implement the design, the rainscreen is the best solution. Bear in mind that it will take more design effort to create a good rainscreen, and nothing can be readily delegated to the contractor, unless he is a specialty rainscreen contractor with proven experience (there are none in many areas). A good design will take more research, detailing, and follow-thru during construction than a barrier wall. Because of this attention to detail, not every project is a candidate for a rainscreen. The diagrams below were taken from Wikipedia - http://en.wikipedia.org/wiki/Rainscreen_cladding
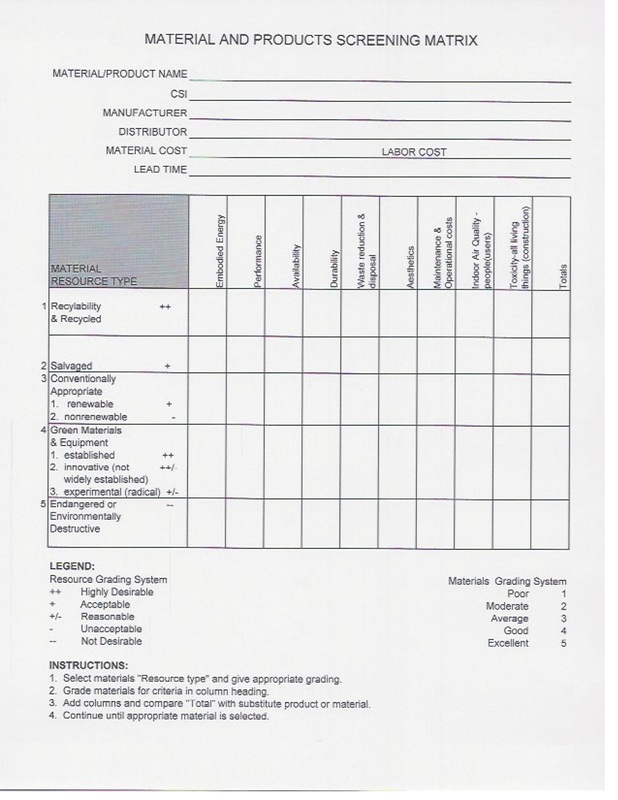 On our first environmental project 10 years ago we used a tool called the Material And Products Screening Matrix. There may be better and more objective tools available today, but the complexity of the issues involved seem to be doomed to a heavy dose of subjectivity.
Using this Matrix we found that some of the usual choices of materials were as green as we were able to provide because of codes, availability and cost constraints. Here is how the matrix is used. First fill in the background information at the top of the sheet. Second, select the Material Resource Type from the column on the left; and, using the given grade and the legend as a guide, establish the type of material and the grade you would assign to it. The third step is to grade the material (using just the row of the Resource Type that you settled on) in the nine criteria in the column headings. The next step is to add up the score and mark its total. The final step is to compare the score to the other materials under study, giving some consideration to the the Resource Type. Since this process is almost entirely subjective we found that it was best for either one person or a small team acting as a group to grade all the choices under study. If you delegate different material evaluations to different people the subjectivity becomes too questionable to defend. You can download the Material And Products Screening Matrix with this link. |


x
Archives
February 2024
Categories
All
|


Architekwiki | Architect's Resource | Greater Cincinnati
© 2012-2022 Architekwiki
© 2012-2022 Architekwiki