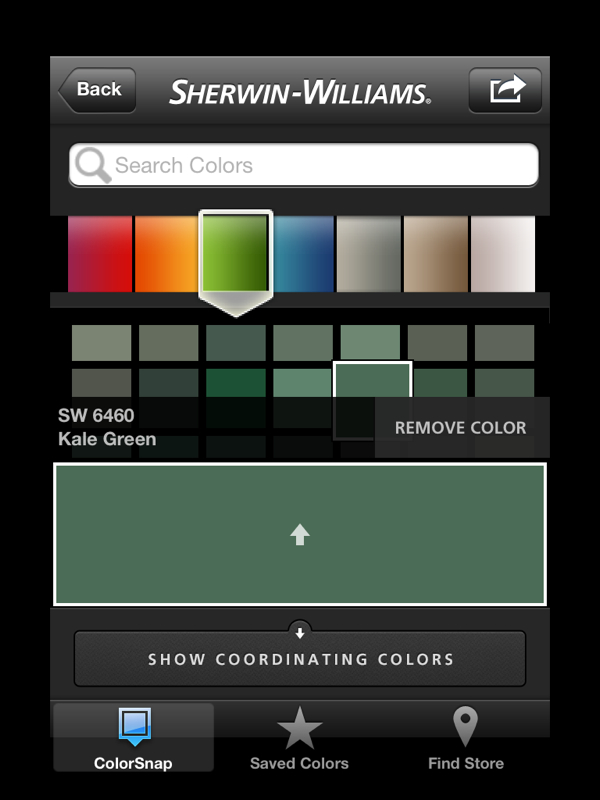
 click image to go to the App Store I have used several Project Management Tools similar in concept to PlanGrid - Buzzsaw, Project Central, AutoCAD 360, Basecamp... What works so much better with PlanGrid is the ability to easily annotate your drawings inside the app and publish the markups to the whole project team. The markups could be coordination comments to the design team (or client!) in the design phases or correction comments to the contractor during the construction phase. PlanGrid really excels at graphic communications. Site photos are easily integrated into the drawings to enhance the punch list process, too. Projects are set up on www.plangrid.com and shared to other team members by browser, tablet or phone (which works surprisingly well). Input by team members using a tablet is very easy, so annotations can be done anywhere. 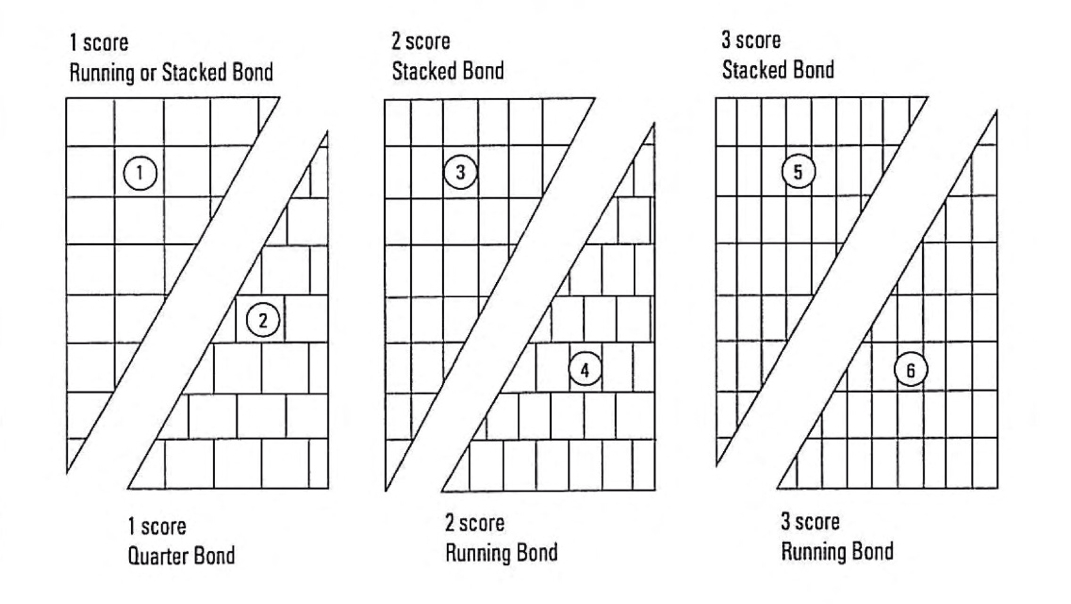
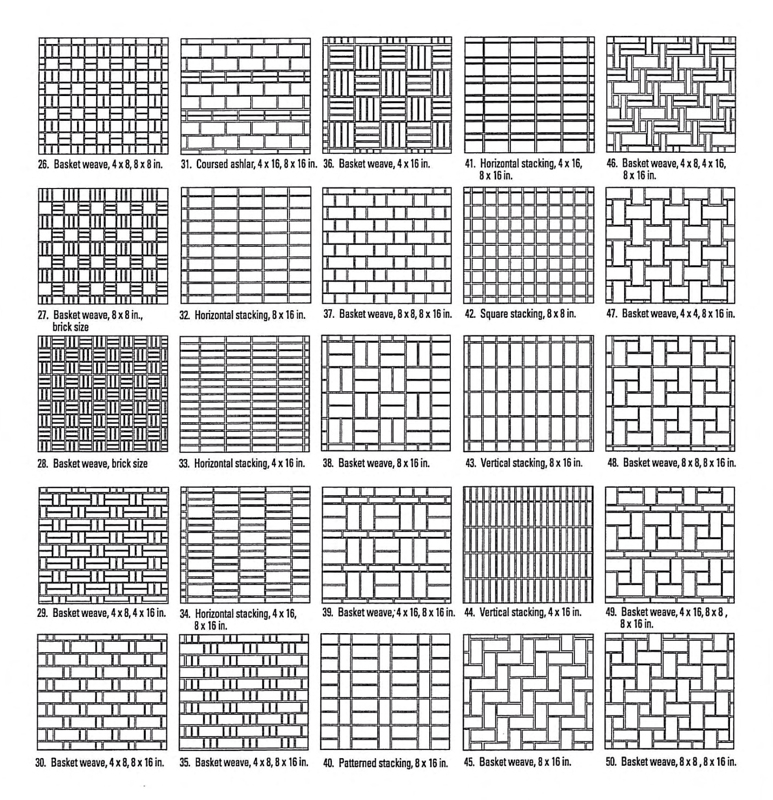
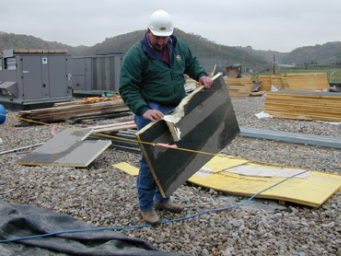
Block bond doesn't seem like something that needs much thought, but there are a couple of things to consider. Running bond is usually the assumed coursing bond and is the most common solution. Stacked bond is less utilitarian in appearance and the most used alternative. A more tile-like appearance can be gotten from scored block, which reduces the apparent scale of the standard 16x8 block face. It makes a big difference in appearance and adds very little in cost. The single score block is pretty standard. Double and triple scores are possible with a special order. This gives you a choice of 8x8, 5.33x8, and 4x8. It’s also possible to use various sizes of block to get a more un-block-like appearance, something more like stonework. One caveat, if the wall is load-bearing or quite tall it may need grouted reinforcing in the cells of the block. The cells need to line up to allow the placement of the reinforcing. Many of these bond patterns do not have aligned cells that will accommodate the reinforcing. Below are 50 patterns that you can create with standard sized block. As you can see, there are many ways to add interest to an otherwise utilitarian material. These graphics come from the Reading Rock Block Catalog, which is a very handy reference. 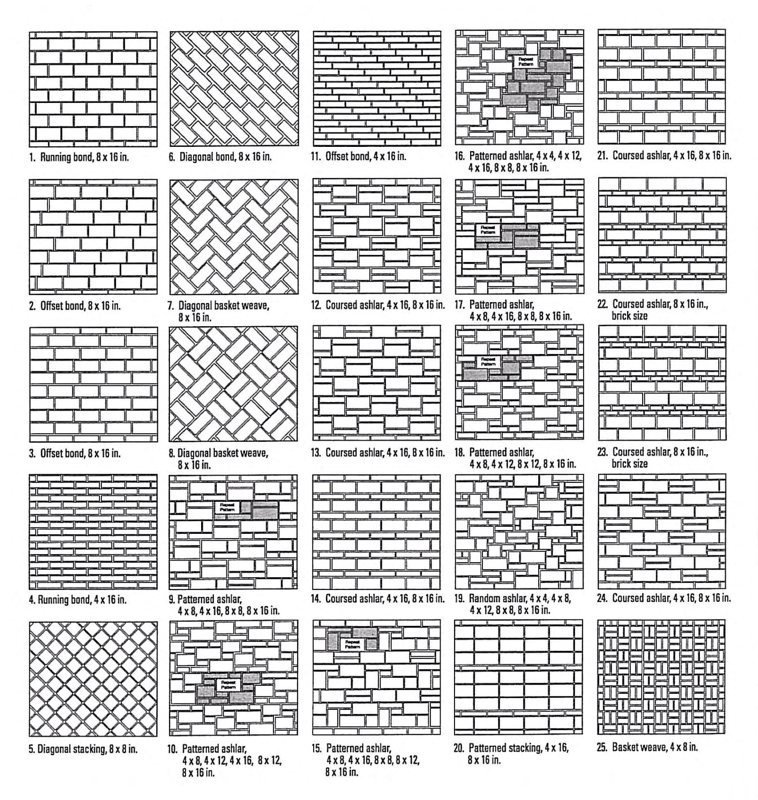
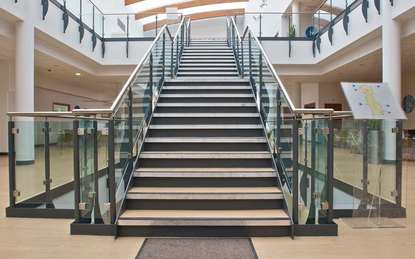 credit: Canal Engineering [link] This is the third post in a series that addresses design aspects of stairs. The earlier two posts can be found here and were called Commercial Stair Layouts - Rule Of Thumb and Stair Technical Considerations - Rule Of Thumb. These form the basis for jumping into finish considerations.
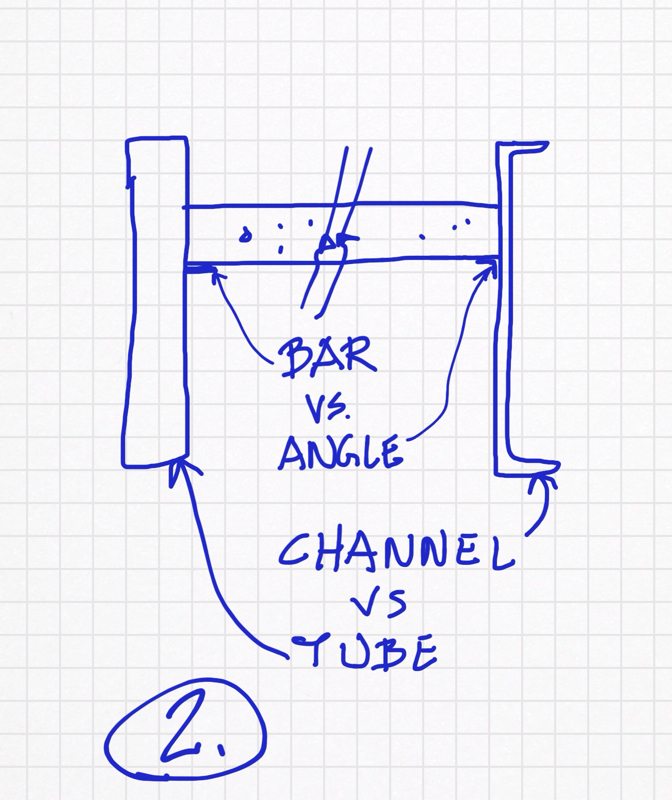
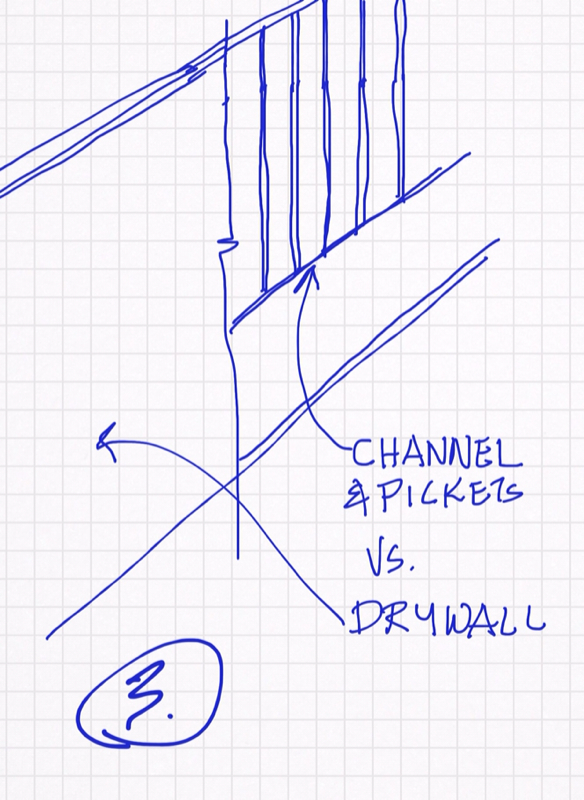
Finish Considerations When I am working out a stair configuration and basic structural considerations, I find that is it helpful to have a concept of what I want the final stair to look like. This might take a half hour longer during the early design, but it can save you hours of changes later. There are four components of a stair that need consideration - Stringers, Hand Rails, Guards, Treads/Risers. Stringers The reasons that you might consider one material instead of another was covered in the 'Technical Rule Of Thumb' noted above. 99% of the time I use steel for the stringers. If I want the stair to be a focal point or a design feature, I discard the usual channel stringer solution and start to consider using a plate, a tube or a pair of boxed channels. I like the way these structural shapes look. You will need to get your structural engineer involved at some point, but there are lots of ways to get the look you want by varying the structural characteristics of the steel stringer. For instance, a standard 12" steel channel could be doubled up to form a crisp box shape about 3" x 12". Usually getting the shape you want "overdoes" the structural capacity, as long as you stay close to a 12" depth or more. This same stringer could also be a 2" or 3" x 12" tube or a 1-3/4" x 12" box shape formed by welding a plate to close the open side of a channel. Or keep it really simple with a 3/4" x 12" plate. In all these solutions a key to looking good is to remove (grind off) all mill marks, grind welds smooth, and fill any joints by continuous welding or by using body filler. Hand Rails Code has lots to say about hand rails, limiting diameter, shape and clearances. Hand rails can be wood, steel, aluminum, stainless steel, or nylon-covered metal. I think wood looks a bit out of place unless your building has a lot of wood trim elsewhere. Steel needs to be painted and the paint rarely stays intact for more than a month. I tend to use a lot of anodized aluminum for hand rails with a hairline jointing system. Stainless steel usually costs more and is harder to get and keep a good finish on. Nylon-covered metal is fairly expensive, but it is the only way to realistically introduce color. I don't like to leave the hand rail mounting brackets up to the contractor's discretion. The wrong brackets will "kill" a lot of design effort. Guards Guards are another item that the code controls by dictating configuration: height, strength, openness, climb-ability. The choices are pickets, screens, panels, glass, and solid. Before the latest International Building Code was released, which I haven't reviewed yet, the non-climb-ability provision eliminated everyone's favorite solutions - the horizontal rails, cables. This eliminated a lot of descent-looking solutions that weren't terribly expensive. You are left with pickets at 4" on center or jump right into some fairly expensive screens or panels. The screens are made of wire or expanded metal lathe in frames that are made to the sizes needed to fill the guard openings between posts and rails. Panels are similar except mostly solid and made from wood, composites or sheet metal. The next big jump in cost is to glass. The tempered glass is expensive, and some of the stainless steel posts can take your breath away. Of course you can always put your own system together using epoxy painted steel posts and standard fittings to hold the glass. Unfortunately this usually shifts the cost out of construction and into design where you might not be compensated for your effort to save money. Solid guards are a low-cost solution. You need a steel framework into which to set metal studs and drywall. This solution works best when you can create an interesting shape out of the stair or you just want something without the curse of pickets. Treads/Risers The typical commercial stair has treads and risers made of concrete-filled steel pans. Code may also dictate 'closed' risers. How to dress this up? Rubber and vinyl are the only products that I can think of that are designed to solve this issue. Unfortunately, they don't really offer an up-graded appearance. They are the 'picket-solution' of tread finishes. Carpet is the old standby and works well. Wood, stone, tile, and other floor finishes need some careful attention. The leading edge of the tread is very susceptible to impact damage or becoming a tripping hazard. Another issue is that a flooring over 1/4" in thickness starts to impact the stair configuration itself and may need adjusted riser heights at the top and bottom. That said, a 1" stone tread is well worth the attention to detail. If you have gotten this far, you probably fall into one of two camps. First, those folks who can't wait to get their hands on the next stair design. Second, those folks who are sure they don't want to design a stair. I like stair design. It is like a mini-project with all the same considerations as a building without the pesky need to integrate the M/E disciplines.
I've been working on a series of articles about designing stairs. There isn’t any special order to them. The first one was Commercial Stair Layouts Rule Of Thumb about a month ago.
The technical considerations I’m talking about are selection of materials, and structural detailing. Here is how I usually proceed. The vast majority of buildings we have designed are Type 2B, which back in the day was known as “unprotected non-combustible”. That ’non-combustible’ part all-but-eliminates wood stairs. But other issues that work against wood are the width of stair required in non-residential buildings and the difficulty of joining the members structurally. It may sound odd but it is much simpler to build a steel stair. The standard joining methods scale up very nicely in steel; not so much with wood. This leads to not only more difficulty designing the stair but also building it. The perceived savings by using wood quickly disappears. We can dispatch concrete stairs by simply saying they work great, easy to design and, unfortunately, require lots of skilled carpentry labor to construct. This prices them out of reach for most budgets. Steel is the workhorse when it comes to commercial stairs. You see them everywhere - confirmation of their fitness. You may have also noticed that they can be ugly. The typical exit stair is made from channel stringers, a concrete-filled sheet metal pan resting on angles fastened to the stringers. The railings are steel pipes with steel bar pickets at 4" o.c. It can get rough. But there are several things you can do to improve the looks. These are simple and well worth the effort and cost if the stair isn’t completely utilitarian.
A couple of other tricks that improve the appearance of stairs are: a) adding a little width to make a more gracious appearance; b) holding the descending riser back one tread on a switchback stair so the handrail can make a smooth transition; c) splay the stringer(s) at the bottom for a spartan version of a Renaissance flowing stair; d) use the strength and workability of the steel stringers to ’suspend’ and display the stair. Once you are conversant with the detailing and code limitations, push the limits. If you are ever in Las Vegas, check out the stairs in the high-end shopping venues to see how you can make the stair into an art object! Sounds like tax-deductible research to me. Stair Finishes are considered here.
Hard Walls - The Traditional Office
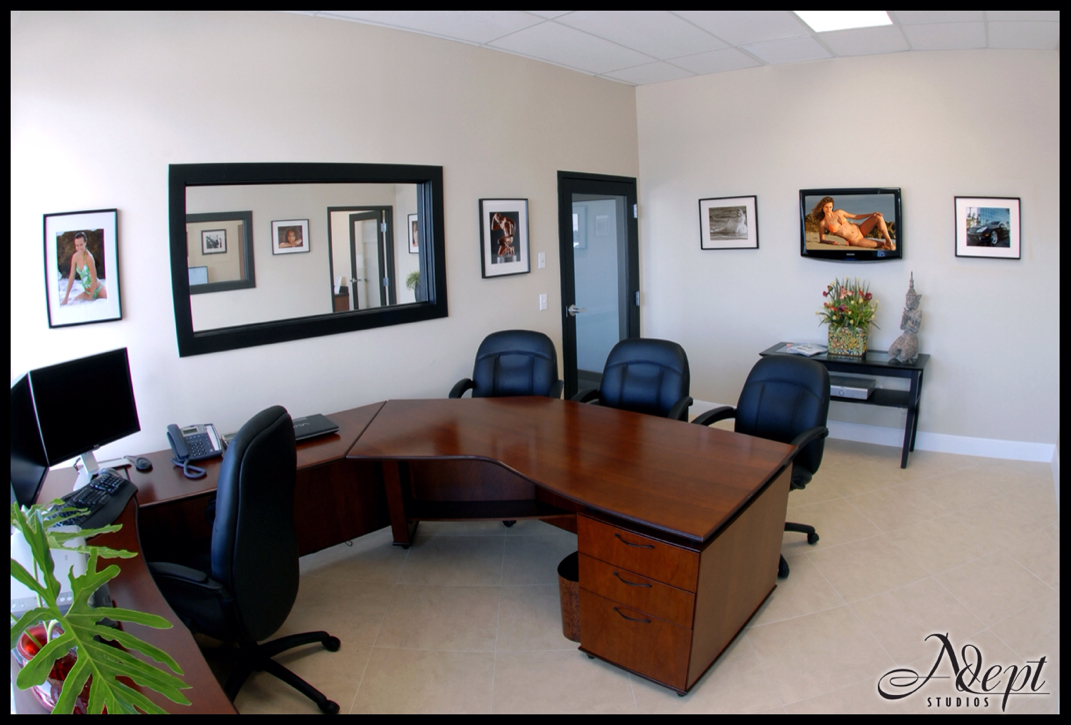
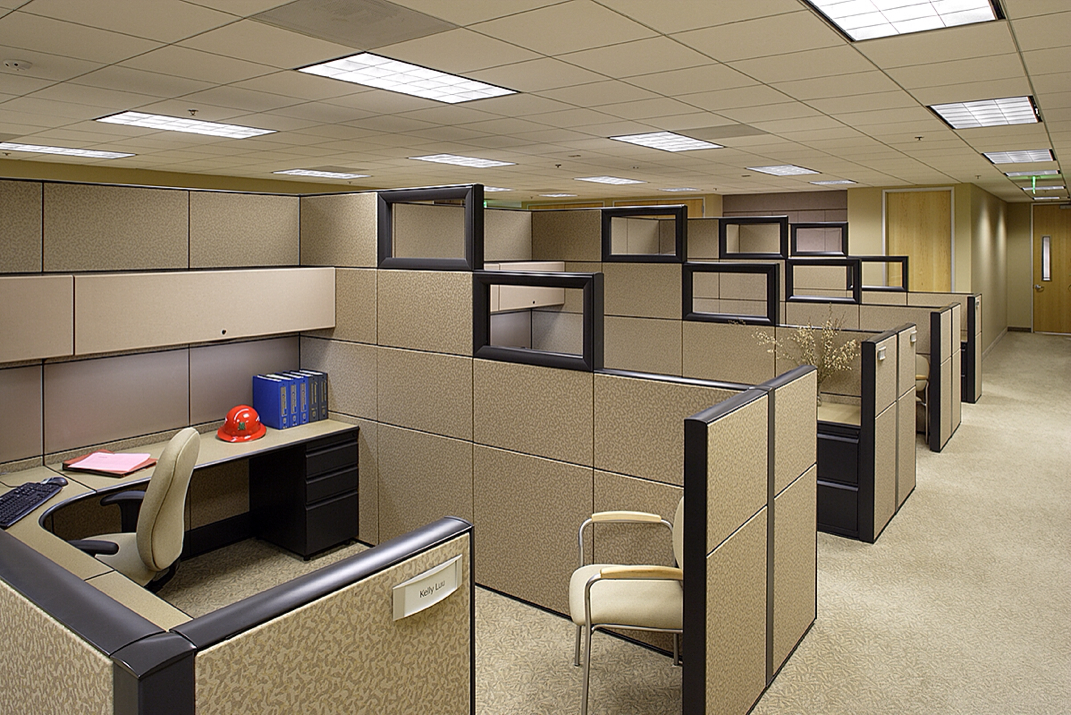
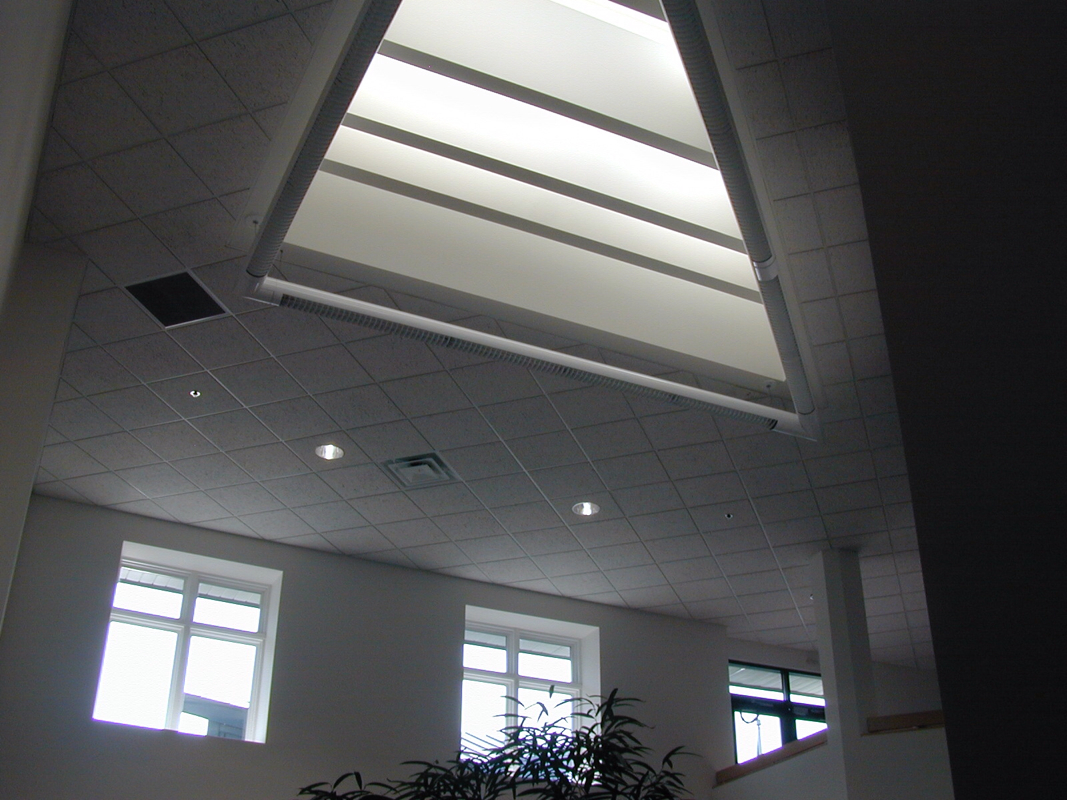
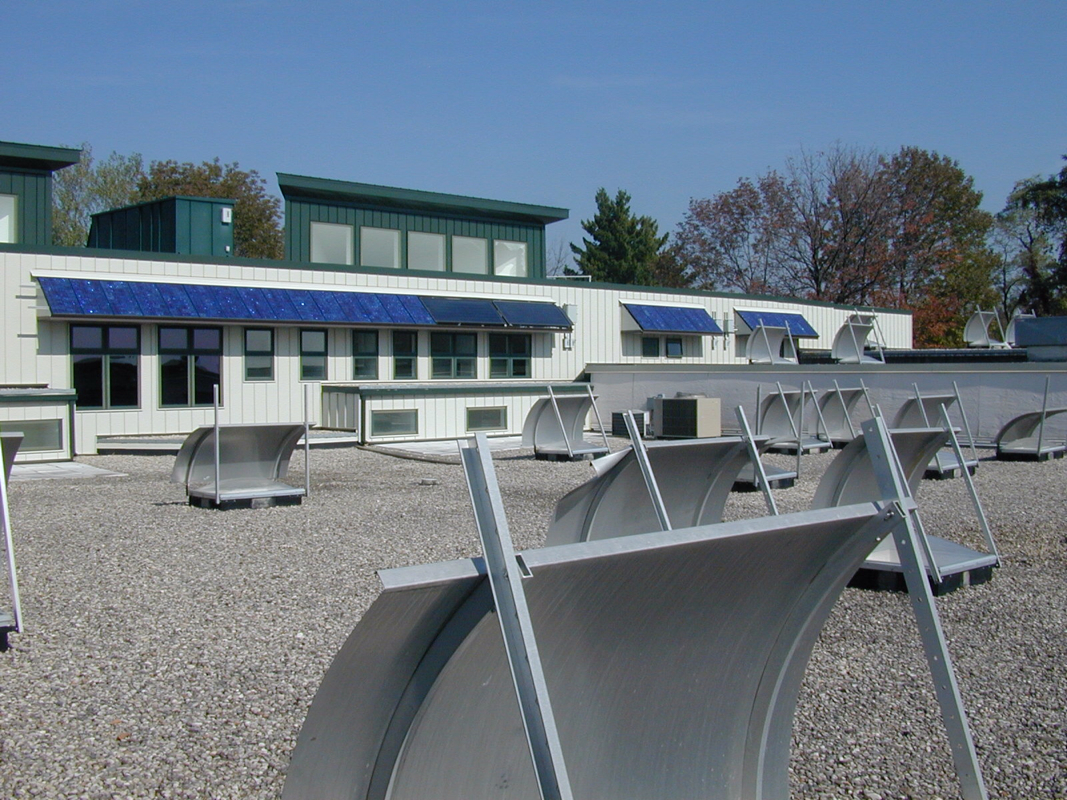
The traditional office supports the top-down way of working. The private office is recognized as a status symbol and it is the best at providing personal territory. Hard-walled offices have some advantages that, if needed, are difficult to duplicate with cubicles, let alone open plan offices. A hard-walled office is more secure and it can provide the best visual and acoustic privacy. It is the ideal space when concentration is required or when sensitive conversations take place. The traditional office is usually more expensive to create even if the building space already exists because of the individual wiring, lighting and HVAC. A private office can provide superior day-lighting for the occupant, but sharing access to windows presents a challenge. Cubicle - The New Office Thanks to Dilbert and the uninspired use by large corporations, cubicles have a bad reputation. Even so cubicles have several advantages; and, when implemented with care, they can even be a superior workspace. In general cubicles support team, project and collaborative ways of working. This is their strength. Cubicles can be customized to the person and the job in ways that aren't usually feasible in a traditional office. For instance it is very easy to have twice as much work surface at your fingertips. Drawers and shelves can also be located for convenience in the type and quantity needed. The amount of and height of enclosure can vary to support the degree of interaction or isolation that is desired. For the organization there are several benefits as well. Cubicles can be reconfigured quickly without mess and without changing lighting and air conditioning. Cubicles can be depreciated more quickly and can be re-used over and over. They can house an employee in a better work environment in 2/3 the area of an office. Cubicles have a lower life- cycle cost. Our first Herman Miller Action Office cubicle components were purchased 30 years ago and are still providing service. They have been reconfigured at least every five years and enhanced with new and refurbished pieces where needed. A 100 SF cubicle provides a much nicer work environment than the same size traditional hard walled office. Hybrid Usually the best solution is not an either/or proposition, but a mix of hard walls and cubicles. The ideal solution is to select the best type of work space for each individual and the job they perform. An oversized hard wall office used to house a group, in traditional furniture, cubicles, or a mix encourages a team approach and provides some of the benefits of hard walls along with those of the cubicle. My personal preference: a large cubicle. But I am also quite fond of an informal home office. 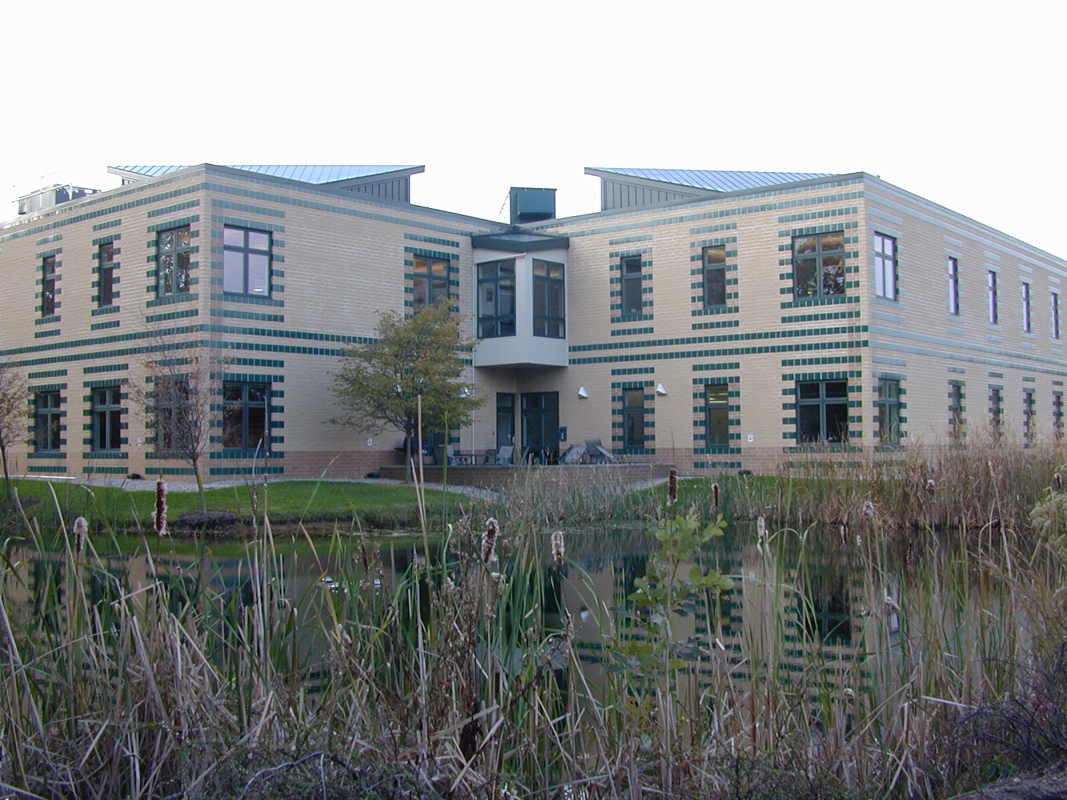 Back in the mid-1990s we held a charrette to help a client comply with the parent company’s desire to be sustainable. We brainstormed all the ways that could contribute to that goal. Out of a list of 20+, we found that a few were surprisingly easy - recycling steel and drywall. We found a few were not legal or could not get approval in a reasonable timeframe, if at all - composting toilets, gray water re-use. We found that a geothermal system using an on-site pond was more energy-efficient than any other alternative. Through energy modeling we found out how valuable day-lighting was, and how the occupants’ connected load could undermine a lot of other goals. We set about implementing all the initiatives that were feasible; and especially concentrated on the three best tactics for saving energy - geothermal heating and cooling, day-lighting and reduced connected load. GEOTHERMAL HVAC is usually the main energy use in a building. Although a geothermal system has higher first costs, the energy consumed is reduced by mechanical advantage to the smallest amount for the same results. Often the first costs are paid back through reduced energy costs in three to ten years or less. Government subsidies (through 2016) figure into the calculation nowadays. We maxed out the pond capacity, and used a geothermal heat pump system for the 27,000 SF of offices. The extra pond capacity not needed for the offices was used in the plant for process heating. DAY-LIGHTING Artificial lighting is the second highest energy cost in commercial buildings. Day-lighting can reduce the use significantly, and has an additional bonus. Artificial lighting creates heat, which requires more air conditioning. So you save even more from day-lighting than just by not using lights. Energy use in commercial buildings over 10,000 SF is driven by what goes on inside rather than the envelope. House are the opposite. This has the curious result that commercial buildings are cooled nearly all year around. So the cooling savings from day-lighting is significant and not offset by a need for winter heating. This recent post on day-lighting is a roof monitor system used to light all new common spaces. Existing corridors were skylighted with frosted borrowed lights bringing the daylight into adjoining spaces. The pictures below show two day-lighting tactics that were used. Note the 'Sunbenders' to capture the maximum sunlight most of the year while providing some shading in summer months. Also visible are the PV panels used as window overhangs. The PVs powered the phone computer systems.
REDUCED CONNECTED LOAD
This is just a way of saying to use less power hungry devices. Some things to avoid:
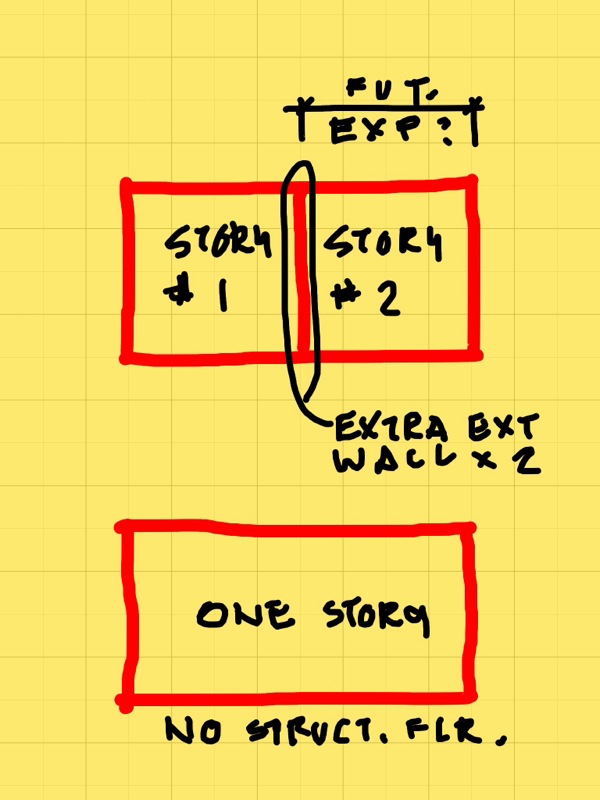
SUMMARY All three of these initiatives have a payback, and make a building more valuable in an enduring way that bicycle racks and public transport access do not (but, that's a rant for another day). Your client will love you for minimizing his/her carbon footprint and cost of operation, whether you try for LEED certification or not. Epilogue The building we designed passed to a new owner when our client’s business was purchased. Alas, the new owner wasn't interested in the building’s ’Green Pedigree’. When you are starting the design of a new stand-alone building, a number of considerations come up that don't enter the picture for a remodeling or renovation. A major one: How many stories? More stories may allow more overall area or allow space for future expansion. A basement may also be a consideration. More Floors? Additional floors for your building can offer several advantages:
There is one final way in which costs increase because of additional floors - incidental features. The incidental features are stairs and, most likely, elevator and toilet rooms. Besides the cost of these features, they will either displace useable square footage or cause you to increase the overall size of your building.
Another consideration is the area of each story. Stories that are less than 10,000 SF are not as efficient because of the higher percentage of floor area given over to ’core’ functions. So multiple floors can work against you in this way too. Most of the time the advantages of additional floors are well worth the additional cost, but additional floors are inherently more expensive. This article has a more detailed analysis. What About A Basement? Basements are a special case when it comes to stories. Even though the same issues apply as discussed above, basements cost less than upper floors of a building. This is due to the lower cost of the exterior walls, lack of windows, and (usually) more Spartan finishes. Basements may make sense because of sloping land or the need for significant space for storage and building equipment. If this is the case, a basement will save money overall because the cost per square foot of basement space will be 20% to 40% less than upper stories. However, basements are not free. If the basement space is not really needed, it will increase overall costs. Perhaps the idea is to use the basement when you need more space. But a basement will not be as flexible or as suitable for many needs when that time comes. For a more in-depth analysis, see this article. An alternative strategy to consider for expansion is unfinished upper floor space. Unfinished upper floor space will cost more than a basement but it will be much more flexible in how you can use it. And significantly cheaper than an addition.
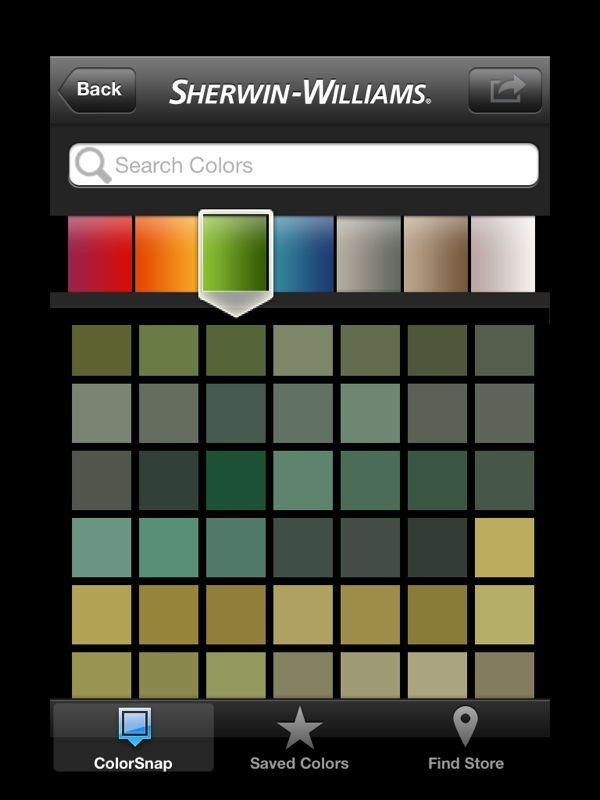
TAKE A PICTURE Let's say you want to pick an accent color. Take a picture that shows the current color. Point to the color in the photo to select it. The app matches it to the closest color in the system. From there you can look at four coordinating colors. The colors seem to be two pairs, each pair containing one lighter color and one darker color. (See the bottom photos.) Select one of the colors. Done. ANOTHER METHOD Another approach, using the iPad app, after you have 'pulled' a color from your photo; you can select it to see its details. This will include a list of any 'collections' that include it. From there select 'Explore Color' and select one of the collections to see other colors that are part of the collection. The collection will contain several colors that "go with" your starting color, but not all will be great choices. Some discernment is required.
FEATURES
By the way, there is an iPad app as well as an iPhone app. They are very similar but the features are more numerous on the iPad version.
Since the App is free, I suggest getting it and playing around with it to see if it is a 'keeper'.  If you have watched the TV program, A Person Of Interest, this concept will be familiar to you. The program is based on a city-wide surveillance system that ties all independent surveillance systems together, analyses the data, and outputs "security issues" for the stars of the show to resolve. (Supposedly NYC actually has something similar up and running.) In the more mundane world of the individual facility something similar is possible. By adding computer analysis to your new or existing video security system, you can receive live alerts to the presence of anomalies without anyone watching the camera feeds, or without risking that the watcher is distracted or simply misses the event. Further, there are some events, like the 'package left behind' that are very difficult to notice in a busy space. The definition of video analytics according to Honeywell, a major vendor in the field, is "cutting-edge software that uses algorithms which detect, track, analyze and classify behaviors and objects, vehicles and people in a live or recorded video system". The main applications are detecting incidents that are difficult for conventional sensors; detect, track and alert on incidents that threaten operations; monitor more cameras effectively with less labor; and collect data for operations. Two key benefits of video analytics are the elimination of storing vast amounts of irrelevant data and of 'inattention blindness'. A military study of surveillance demonstrated that, when monitoring two or more sequencing monitors, the operator will miss as much as 45% of all scene activity in a two minute period. Over a 22 minute period the percentage missed goes up to 95%. Here are some ways that video analytics can be used.
Video Analytics can provide better security, improve the efficiency of your system through alerts and searches, provide the additional benefit of counting, and reduce costs of personnel, data storage, and data collection for management use. Costs vary significantly based on what you want to accomplish. However it is not hard to imagine that video analytics will become standard in more and more facilities in the near future. orig post date NOV 2012  The National Concrete Masonry Association [NCMA] is a valuable resource for technical information about concrete block. Their e-Tek articles are industry standards for every concrete masonry topic you can think of. A PDF of the NCMA e-Tek table of contents is embedded below or can be downloaded. The e-Tek articles are accessed through one of the member websites. So, to access these e-Tek articles follow these 6 steps.
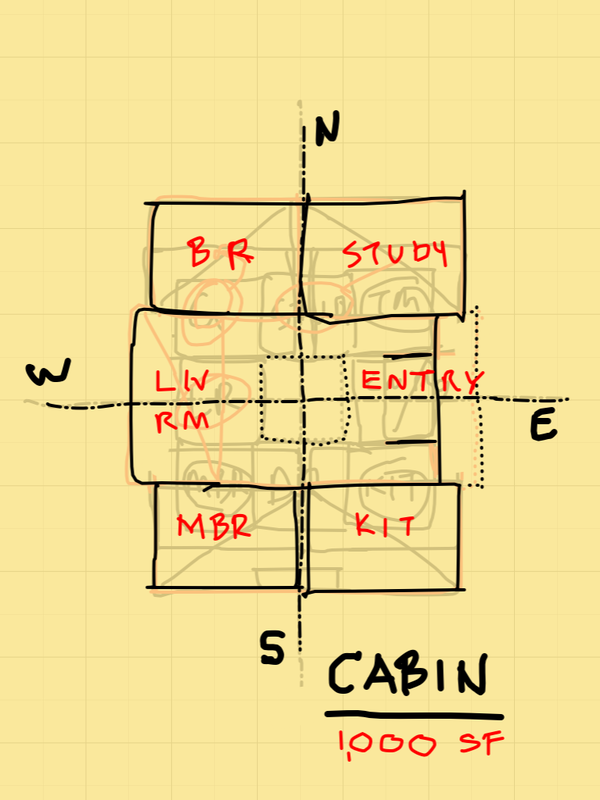
What is Sthapatya Veda Design? Sthapatya Veda is a 5000 year old Hindu Vedic text that describes how to align a building to the cosmos in order to assist in aligning the individual with the cosmos. The correctness of Sthapatya Veda is beyond proving in a scientific manner, although there are many scientific claims made about Sthapatya Veda. I think that believing in Sthapatya Veda confers benefits to you similar to the placebo effect, making the scientific correctness a moot point. Your belief is thoroughly tested because nothing about Sthapatya Veda design is left to whim. There are prescriptions for everything from choosing a site to construction materials. How to apply Sthapatya Veda Big Picture An east-west orientation is desired to align with the rotation of the earth and circuit of the sun, which is reflected in the arrangement of the planets around the sun. The rotation of a body attracts everything around it into a plane perpendicular to the axis of rotation, e.g. the rings of Saturn. East is the preferred direction in terms of orientation. For reasons that I have never seen explained, north is an acceptable alternative, but not ideal.
The Site
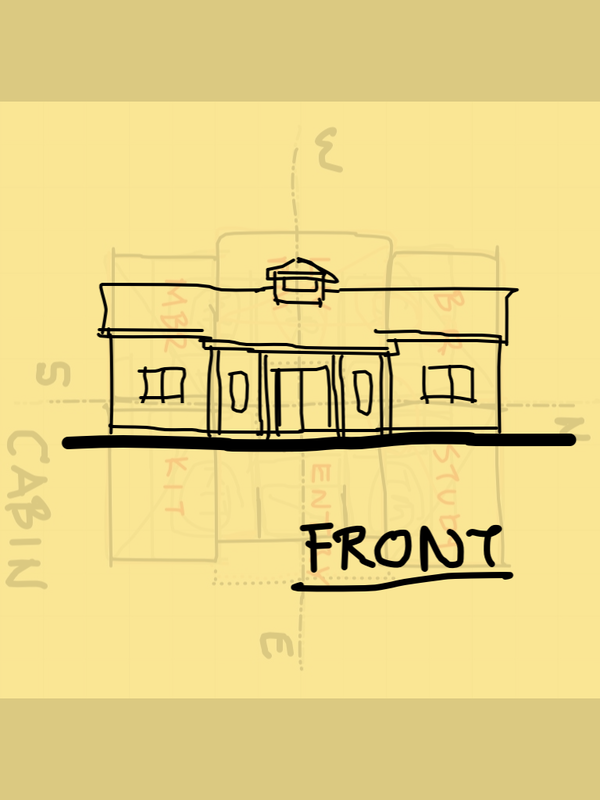
The ideal site has a body of water to the east or north, and the ground slopes down to the east so that the eastern sun is not blocked. The building should sit on a slightly raised plateau that is rectangular and oriented precisely to the solar axes. Magnetic north is not the same thing. One way of finding the solar axes is to physically mark your site with a center point and the precise location, relative to the center point, that the sun rises and sets. A line connecting those two rising and setting points is the solar east-west axis. A line perpendicular to this is solar north south. Once you have the axes determined you can begin laying out the site and planning the building. A feature of the site plan is a barrier in the form of a hedge, wall or fence at the boundaries of the Sthapatya Veda site, which of course are parallel with the solar axes. The Building Orientation is to the solar axes with the entrance on the east. The shape of the building should be symmetrical and rectilinear. A central unoccupied space, extending up to a glazed cupola, is always a part of a Sthapatya Veda building. Rooms have preferred locations within the plan. Proportions of spaces follow conventions. Amazingly, with so much dictated by Sthapatya Veda, there is nevertheless lots of room for variation. A Sthapatya Veda building will almost always cost more than another building of the same size. To learn more: A Google search for "Sthapatya Veda buildings" will give you some visuals and other resources to explore. The sketches above represent my attempt to design a Sthapatya Veda cabin. 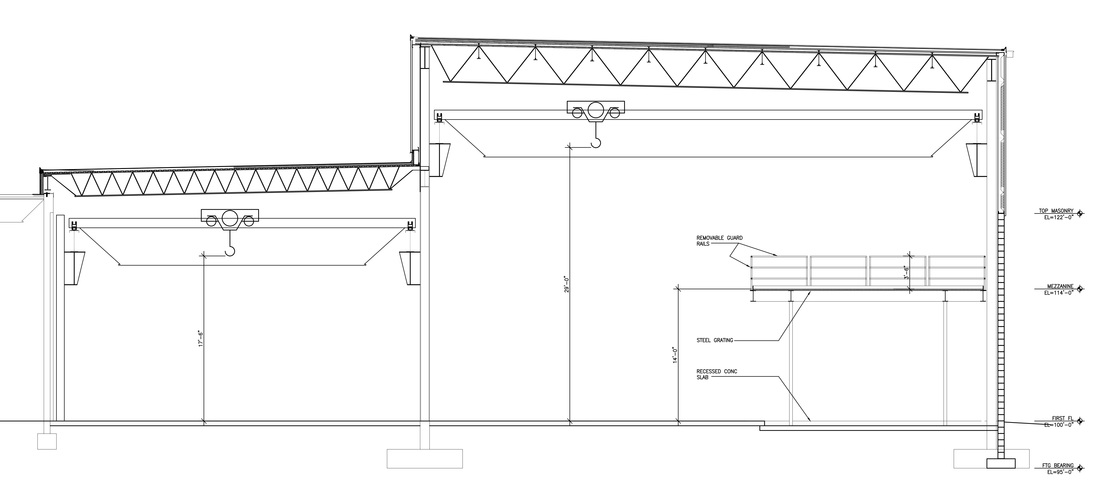 Crane Bays The most common type of crane that we have dealt with is a bridge crane. These cranes have spanned bays as wide as 80' and had hoists rated for lifting 20 tons. A 35' (or taller) building is often needed in these circumstances. These cranes travel most, if not all, of the length of a bay of a building, the crane bay. The main components of a crane assembly are: footings, columns, crane beams, crane rails (like railroad rails only lighter weight), crane bridge, truck, and hoist. Each of these components has its own considerations. The columns - often separate columns are used to isolate vibrations and bending caused by crane beam brackets. X-Bracing may be required. Structural capacity of crane beams needs to limit sag and camber can be a problem too. Either can stress the trolley carrying the end of the bridge and in extreme cases causing it to become stuck. Welding the crane rails to the crane beams is not desirable for long crane spans or heavy cranes. J-Bolts seem to work best and are easy to adjust. OSHA has clearance requirements at ends of the bridge span and above the truck and hoist. Electrification of the crane is accomplished by festooned cable or buss bar. The electrician supplies power to a point along the crane beam for hookup by the crane erector. Height to the crane lifting hook is the vertical criteria around which clearances and structure are worked out. Clear span or horizontal travel of the hook determines the width of the bay or building. It is rare that the hook needs to get to the edge of the specified clear width. Take care with roof drains, exh ducts, or plumbing vents that there is a path for each of them that respects the required clearances. Often lighting levels need to be high in a crane bay used for assembly work. The vertical clearance can make this a challenge. Consider portable floor set mobile lighting. It may provide better light where needed rather than trying to light the entire crane bay to 70 fc. If feasible this could reduce energy use and provide better lighting. Get the Owner's crane supplier tied down early so coordination doesn't cause construction delays and extras. Not all cranes can fit as intended if the building design is determined without the crane specs.  The issue of 'reception' has changed from a typical function for every office-based business from corporate headquarters to DMV clerk to a begrudging necessity for those who can't eliminate the receptionist. Baring elimination, combining job functions becomes the next step. Some of the solutions are to use a security person to also greet and direct people, or place a clerk or secretary at the reception counter.
If you find that a reception counter is needed, the first decision is to determine the full role of that person. From that determination, the next step is to decide on the size of the station and the height that is desirable. Rarely is the reception counter 36" high because this would require the clerk to sit on a stool; or, if the clerk side is 30", then the client is looming over the clerk. The stool or the 'looming' is always a deal breaker. 30" is always desirable for the clerk side. The degree of customization is always an early decision to resolve. Systems furniture can provide both customization and changeability. Haworth and Herman Miller offer very attractive systems solutions. In a prestigious setting where interaction with the receptionist is brief, a desk or table (with modesty panel) is a good solution. Telephone reception is the only other job function that is easy to combine with this station without ruining the effect. Because of that, the 30" reception counter is used less and less, except for any portion of the counter that needs to be accessible per ADA. The more common solution is to provide a 30" counter height on the clerk side and a 42" high transaction counter on the client side. (See this Detail) The 42" height offers decent screening for the equipment and cables that would otherwise be exposed to view and tinkering. The transaction counter works best if it is 14" deep, which allows paperwork to be easily handled. A two or three inch difference between the edge of the transaction counter and the base board prevents the client from kicking the counter as they move close. This recess can be provided in the toe space or in the overhang of the transaction counter or both. One other configuration that can be used is a raised platform on the clerk side. A 12" high platform places the client side at 42". This creates a comfortable eye-to-eye arrangement with the clerk seated at a 30" counter and the client standing. (See example) The finishes of the counter can be almost anything - plastic laminate, solid laminates, solid surface material, wood, stone, etc. A few other things to consider are the flooring that will get the most wear at the clerk stations, electronic equipment placement and wiring needs. You might also consider an unmanned station using a flat screen display for greetings, logo, company news and a CCTV link to a behind the scenes workstation(s). Years ago Fidelity Investments used a kiosk for guests at one of its regional offices. You logged in and were directed to the appropriate floor where you were greeted by an escort. I think that is what the future reception process will look like.  Masonry is the art of shaping and arraigning units to form walls and other elements. Masonry can be clay, stone, concrete block or manufactured stone. It's a time-tested material - the Great Wall of China, the Roman Coliseum and nearly every structure over 500 years old! Advantages for your building:
Good to know:
Link: More about masonry Masonry is unique among building materials.
 In my opinion flat roofs get a bad rap. Most types of flat roofs will last beyond their warranty period if you have a roofer check them every autumn. The reality is that people ignore their flat roofs; and, when trouble appears, they get talked into a new roof as the solution. I read that the national average is 7 years for a commercial roof. That is less than half the expected life of almost every type of flat roof. There are only three possibilities: people are installing the wrong type of flat roof, people are not maintaining their flat roofs, or flat roofs are a bad idea. My experience is that the first two possibilities happen all the time, while too many flat roofs last longer than a shingle roof for the third possibility to be true.
In some cases a flat roof is almost impossible to avoid. Buildings over 40' wide get progressively harder and harder to accommodate a sloped roof because of the volume of space that is created. Codes start creating extra costs to meet fire ratings for the roof structure. And many times you might be forced into a more costly HVAC system if there is nowhere to place rooftop equipment. There are two ways to ensure that your flat roof performs as you hope and expect. Design the flat roof properly, and select an appropriate roofing membrane system. Flat roof design considerations are: 1/4" per foot slope throughout for proper drainage; adequate roof drains and drainage piping; minimal roof penetrations, and all of them properly flashed. The vast majority of roof leaks occur at penetrations and perimeter flashing. I have only seen one instance in thirty years where the leak was in the field of the roof. It is also wise to specify the maximum warranty offered, since this will usually require the roofer to be certified by the roofing material manufacturer. Selecting the right roof membrane system is easier, but still requires attention. Flat roofing types include Built-Up, TPO, EPDM, PVC, Roll Roofing, Metal Roofing. This is also my ranking for dependability. Built-Up roofing - the key to a traditional built-up roof is hiring a top quality roofer, who actually knows how to install the roof properly. I am on the maintenance committee of a non-profit that has a 36 year old built-up roof that is problem-free because of good maintenance, which costs about $1,000 a year for 25,000 SF. Garland Roofing has a top notch evaluation/recommendation service and products to match. TPO - Thermoplastic polyolefin. The critical thing about TPO is the specific product. Some manufacturers have had problems with shrinkage, cracking, etc. One indirect way to evaluate the best manufacturer is by the length of warranties offered. This alone is not always conclusive. Deep pockets to back up the warranty is even more important than length. The ability to 'weld' the seams of the roof is a major advantage for TPO. Since this welding is the weak link make sure you have a qualified and experienced roofer doing your installation. EPDM - Ethylene Propylene Diene Monomer. In my opinion EPDM only has one disadvantage ; it is black. Being black is not a problem for the roofing, but it doesn't meet the current vogue for white roofs. Adding a white laminate or coating can solve the color problem, but at the expense of maintainability. EPDM has a good track record, but you still need a quality roofing manufacturer and roof installer to get the most out of the roof. PVC - Polyvinyl Chloride. PVC membrane is having its third incarnation, the first two having gone down in flames. The easily weldable seams is its strongest feature. The plasticizers that make it flexible are its weak link. Past incarnations have become brittle and shrunk. And not after 20 years. Besides the spotty track record, there is the chloride. PVC manufacturing is a nasty business - environmentally. Being white is little compensation in my opinion. Roll Roofing is like installing rolls of shingles. I would only use it on a low sloping shed roof with minimal penetrations. Flashing tends to be whatever the installer dreams up. This is a high maintenance product to keep terminations and penetrations weathertight. Metal Roofing - low sloping metal roofing seems like an obvious problem waiting to happen. Every other roofing system tries to be monolithic. Metal roofing is lapped pieces, that move. I don't get it. High sloping metal roofing is a different story, but this is about flat roofs. Separating an existing building from a new addition by a firewall always (it seems) has unanticipated consequences. This refers to a true firewall rather than a fire separation wall. No matter how hard you try, there is always a surprise waiting for you. Technically a firewall must be able to remain standing after the collapse of the structure on either side. This means that the wall cannot help support that structure. A favored way around this is to use two walls, each supporting the structure that is on its side. This approach triggers the need for two fire doors at each opening, one in each wall. Two doors creates all kind of collateral issues, and usually results in a vestibule to separate the doors, which in turn is fire-rated construction. The alternative is to use a free-standing firewall, which is basically a cantilevered wall anchored in its footing. Engineers tend to over-react to this situation. Maybe they should. The two drawings below show how complicated the situation can become. Click the images to download a PDF for easier viewing; or download Plans here and Sections here. 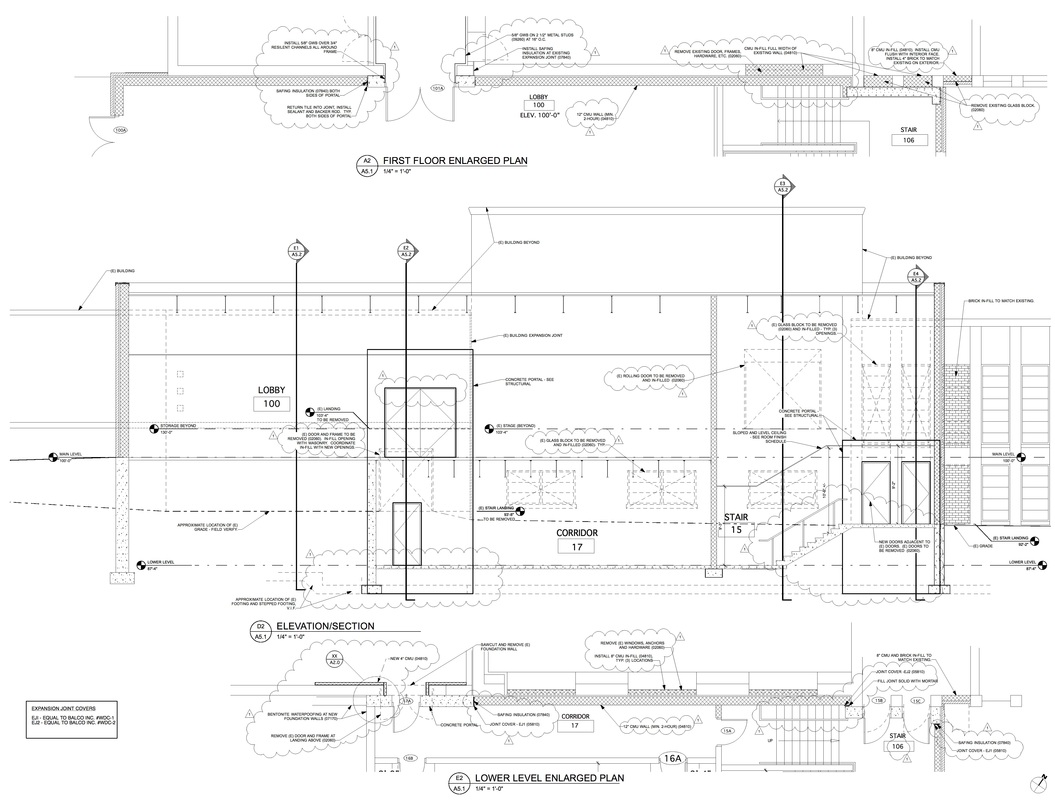 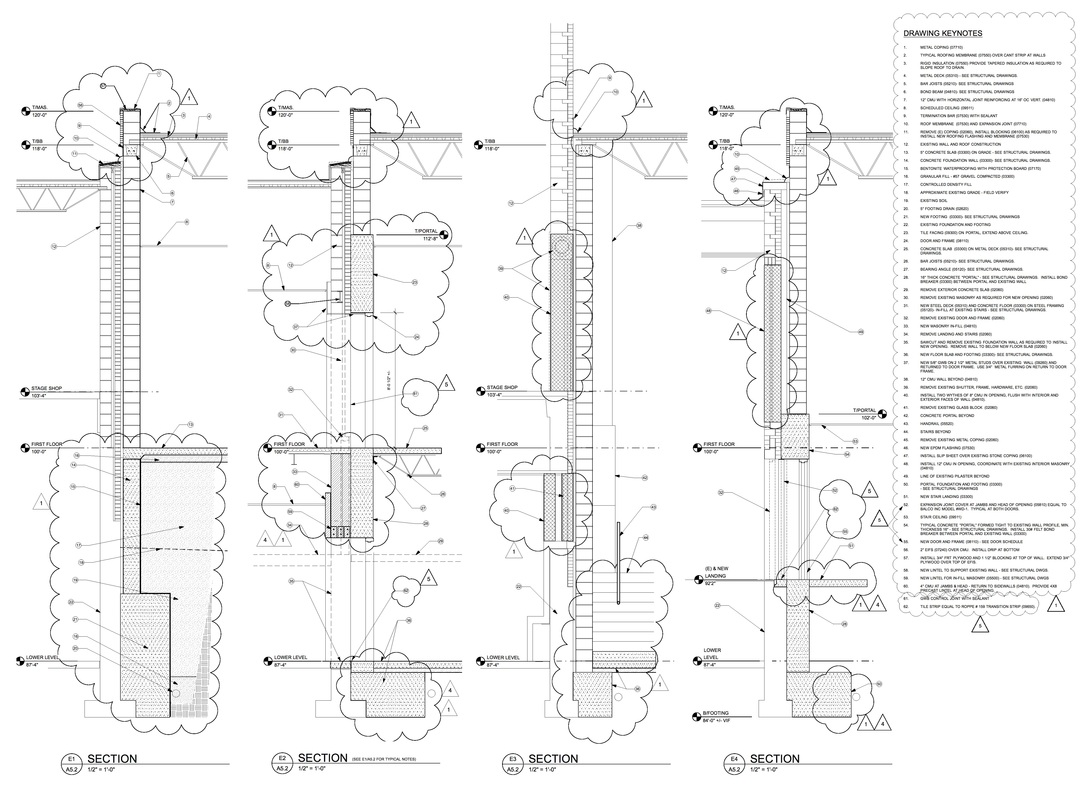 We used single, self-supporting firewalls where we had to pass through the firewall. Elsewhere we resorted to the double-wall solution to avoid the underpinning required by the single wall.
The problem with a single wall that is braced by the construction on each side is that a collapsing building creates a wind load on the wall. There are ways to anchor the wall to resist the wind load; and there are ways to let the structure fall away. There just aren't any good ways of doing both on both sides of the same firewall. If your code official knows this, ... 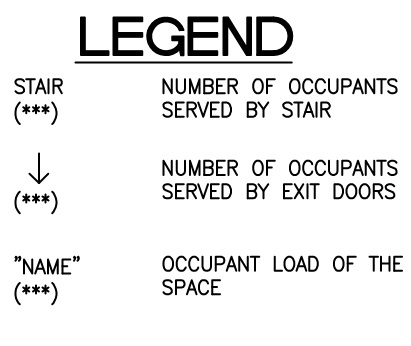 Exit Legend Exit Legend If you are designing an addition to a complicated, large building that pre-dates modern codes, you might be asked to prove that exits are adequate. The method that worked for us in this scenario was this: show the results of our calculations on a floor plan by giving the occupant load of each space, the capacity of corridors and stairs, and the capacity of the exit doors. See the enlargeable legend to the left. The building in question had six different levels including a basement and a 'mezzanine'. Previous additions had also obscured the exit strategy. The drawing below is downloadable as a PDF for better viewing. The first effort was a table to show all this information but it was impossible to follow. Once we hit on this diagrammatic approach, we had the extra benefit that the code official could spot check us very easily. The result was that the plan was accepted once we reviewed the process and how to interpret the diagram. The original diagram was also color-coded by hand to show where the numbers came from. A color plotter would have eliminated that work. 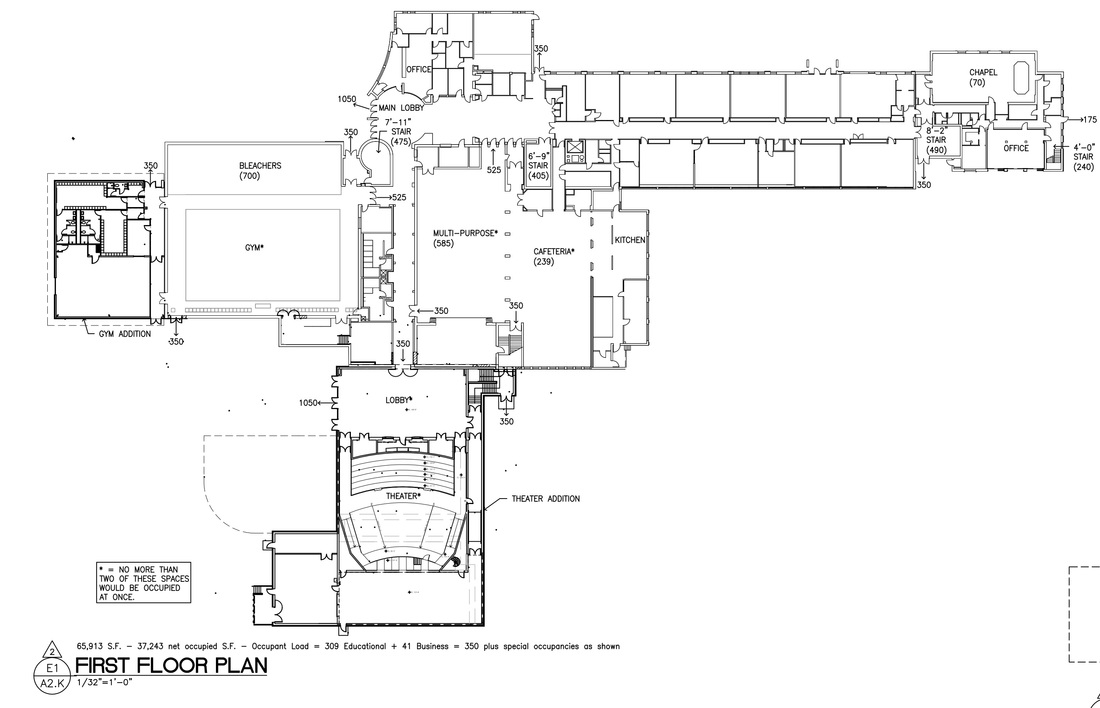 Exit Capacity Plan 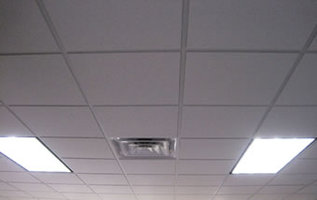 One of the things that I notice about a room is the ceiling. Especially the way a ceiling grid is placed relative to the walls. I think that when the grid terminates against the wall with a tiny piece of tile it looks like shit. I wonder, "Did the architect cause that because of some other relationship that I can't see? Did the contractor just do it?"
My mentor taught me better. "No pieces less than a half tile - anywhere." I found that you can almost always do that. It might mean that you have to center the grid intersection in the room, or center a tile in the room, or start with a slightly offset grid. But there is always a solution. If you try. There are special challenges - non-parallel walls, skewed walls, floating items like a section of wall or columns. CAD really simplifies things since you can move a grid around until you are happy with the edge conditions. Include fixtures in that exercise and kill two birds with one stone. Some times there might not be a great solution unless you can change the layout, which seems a bit excessive. Light fixtures complicate things. Occasionally you find that you can't place fixtures where you want and locate the grid ideally. One way to minimize the issues is to use a planning grid of 2'x2' or 4'x4' when laying out the walls in the first place. If you stay on the grid, which is hard to do, you get a great ceiling tile layout automatically. At some point we decided to write a recipe and move on to worrying about bigger issues. We called that recipe: Rules of Ceiling Grid Placement
Rules 2 and 6 are key. Rules 1 and 7 can be violated for good cause. Rules 3, 4, and 5 can almost always be met.  Cool Roofs Although the primary concern with roofs is water-tightness, you can also gain benefits for energy efficiency. Roofs make up a large proportion of the heat retaining surfaces in populated areas. In some highly concentrated areas, as much as 27 percent of the land cover is roof surface. This can cause what is referred to as an "urban heat island" - a region where the temperatures can be several degrees warmer than the surrounding area. Buildings with dark roof surfaces get hotter and stay hotter longer. Air conditioners must work harder and longer to maintain comfort for occupants. A reflective or white roofing system can keep a building cooler and save money on air conditioning costs. The ENERGYSTAR® Roof Products Program provides guidance in selecting roofing products, as well as a list of products that meet the qualifications established for cool roofing products. This list of qualifying products identifies low-slope roof products that have an initial reflectance of at least 65 percent and a reflectance of at least 50 percent after three years of weathering. You can explore the ENERGYSTAR® site through this link. 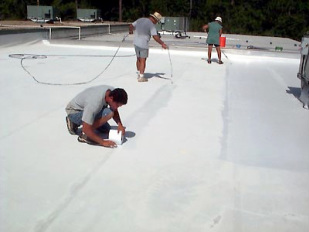 Do You Really Need A New Roof? Years ago I saw a 25 year old tar and gravel roof that you could almost see through it was so worn, but it was only leaking at the edges where the metal gravel stop was embedded in the felts. The movement of the metal had created cracks. Currently I know of a 28 year old roof that is virtually problem-free because it gets yearly maintenance. Replacement will cost $100,000 eventually, but less than $1,000 a year in maintenance has kept that expenditure at bay for over a decade. What should you check before you spend $$$ for re- roofing? • Get more than one opinion. Second and third opinions are necessary. Get advice from the most knowledgeable expert you can find. When all else fails, use a leak detection service (infrared sensing). • Maintain your roof every Fall. Water rarely enters the building through the open surface of the roof - almost always at the penetrations and edges. Yearly maintenance can get you significant extra life. Fall is the best time for maintenance. • Be wary of rooftop equipment. Finally, rooftop equipment is the bane of roofs. A bit of detective work can tell you if any equipment on the roof is near the area of the leak. Many times contractors make "modifications" to your roof with limited knowledge of roofing. Occasionally, their equipment is the source of the leak! If a replacement is truly called for, consider the best roof system that you can afford. The simple fact is that a cheap system will probably be replaced three times before a top quality roof is replaced. The total cost and inconvenience of an inexpensive roof will lose out in a life cycle cost analysis.
 How To Avoid Re-Roofing Our study of "Top Building-related Issues" lists leaking roofs among the top three issues, and often it is number one. You get the impression that you can't beat Mother Nature. Actually, effective roofing projects are completed all the time, but you definitely have to work with nature to achieve success. The average life for a commercial roof is seven years. This is less than half the common expectation of 20 years. The frightening fact: if the average is seven years, half the people are getting even less. One scenario that I suspect is a major contributor to the low life-expectancy of commercial roofs is replacing your whole roof because of a leak that your roofer can't find. The situation is like Rubik's Cube - there are a lot of strategies that don't work. My experience is that there are also many strategies that do work. You should know about these successful strategies. How To Get A Good Roofing Job To help ensure a high quality, trouble-free roof or re-roof project, which may not end up costing you any more, add the following requirements to your bidding documents and insist on their implementation: • Unconditional 2-year workmanship and water-tightness warranty. (Kentucky Department of Education requirement) • Manufacturer's standard warranty of 10, 15 or 20 years - the longer the better. • A Contractor's Qualification Statement with slightly higher than typical requirements for years in business and number of similar roof projects, say, 10 years and 20 projects. • Clear and specific details of every joint, termination, change in materials, and flashing condition. • Pre-installation meeting with attendance required for manufacturers' representatives from both the insulation and roof membrane companies. • A schedule with a representative from the roof and insulation manufacturer present on each day when their product is being installed and flashed. The norm is one visit at the end of the job when things are hidden from view. That is not adequate.  Roof Flashing
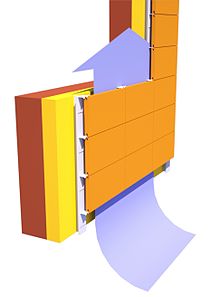
The roof is one of the most essential parts of a building as it protects occupants, contents and interior of the structure from the elements. The most pervasive and difficult weather element to control is water. Roof flashing is usually the last line of defense in the battle against water penetration. Flashing forms the intersections and terminations of roofing systems and surfaces to thwart water penetration. Locations include: wall flashing, expansion joints, counter flashing, base flashing, built in valleys, scuppers, gutters, downspouts, exposed trim and fascias. Flashing materials must be durable, low in maintenance, weather resistant, able to accommodate movement and compatible with adjacent materials. Experienced and skilled installers are necessary to plan, cut, shape, fabricate and install complicated shapes into permanent 3-dimensional, continuous forms. Copper flashing offers beauty in its familiar protective green patina and a long-service life; it will not need to be replaced when the roof is replaced. On a life cycle cost basis, copper flashing is the best choice. A close second is stainless steel. Copper isn't appropriate for every project. Remember design projects in school? Yeah, welcome to the real world. Rather than a blank slate, now there are limitations everywhere. When you are beginning a design project, it helps to know where those limitations lie before you have to rework your design to accommodate them. Take a look at this tool for setting a design strategy that will work. Or use it to ask the right questions before you start designing. Click the image or here to download a copy. 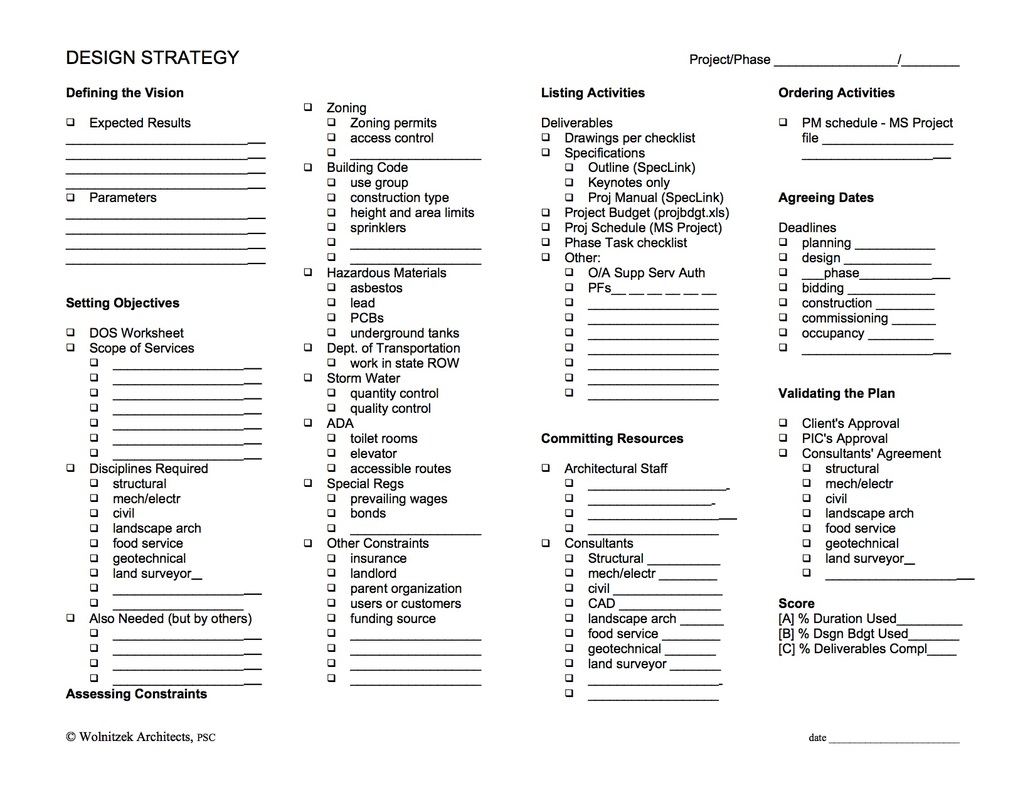 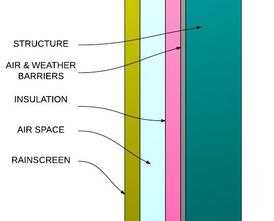 This is a quick overview of the RainScreen concept. Concept In a rainscreen design the exterior surface of the wall is not considered a weather barrier as in most traditional wall systems. Think of wood siding; nothing is intended to get past the siding. In a rainscreen wall, most water is kept out but not necessarily all water. Any water that makes it through the screen is conducted down through the air space and back to the exterior. The archetypal example is a masonry cavity wall. Rather than just one line of defense, the rainscreen provides two lines of defense and the critical second line of defense is subject to only a fraction of the rain water, and it is not wind-driven by the time it reaches the inner barrier. Components
CONCLUSION A rainscreen wall is becoming the expected, modern solution to exterior walls. The benefits outweigh the disadvantages. Where budgets allow and capable workmen can be counted on to implement the design, the rainscreen is the best solution. Bear in mind that it will take more design effort to create a good rainscreen, and nothing can be readily delegated to the contractor, unless he is a specialty rainscreen contractor with proven experience (there are none in many areas). A good design will take more research, detailing, and follow-thru during construction than a barrier wall. Because of this attention to detail, not every project is a candidate for a rainscreen. The diagrams below were taken from Wikipedia - http://en.wikipedia.org/wiki/Rainscreen_cladding
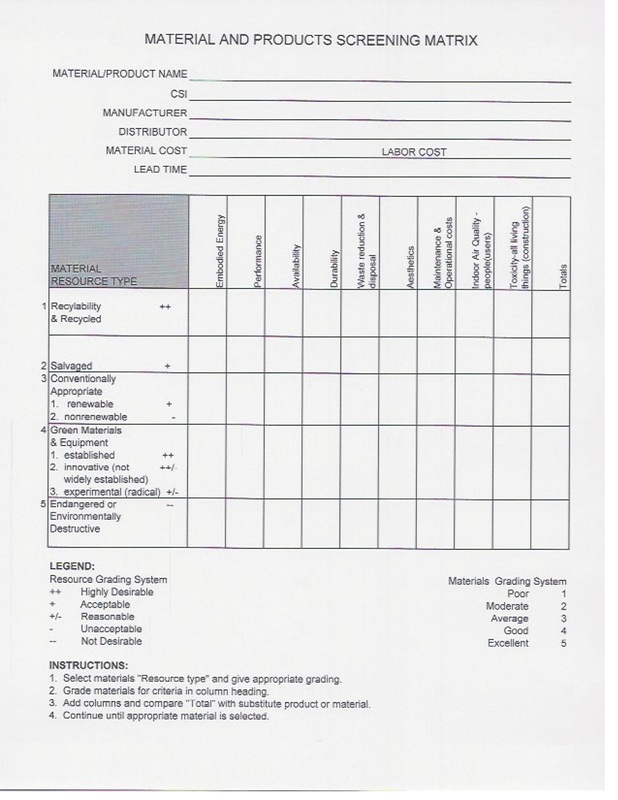 On our first environmental project 10 years ago we used a tool called the Material And Products Screening Matrix. There may be better and more objective tools available today, but the complexity of the issues involved seem to be doomed to a heavy dose of subjectivity.
Using this Matrix we found that some of the usual choices of materials were as green as we were able to provide because of codes, availability and cost constraints. Here is how the matrix is used. First fill in the background information at the top of the sheet. Second, select the Material Resource Type from the column on the left; and, using the given grade and the legend as a guide, establish the type of material and the grade you would assign to it. The third step is to grade the material (using just the row of the Resource Type that you settled on) in the nine criteria in the column headings. The next step is to add up the score and mark its total. The final step is to compare the score to the other materials under study, giving some consideration to the the Resource Type. Since this process is almost entirely subjective we found that it was best for either one person or a small team acting as a group to grade all the choices under study. If you delegate different material evaluations to different people the subjectivity becomes too questionable to defend. You can download the Material And Products Screening Matrix with this link.  I have been fond of keynotes for years (decades). I think they are a time saver, improve the drawings, can be helpful to bidders/contractors, prevent conflicts, and in some ways can act as a checklist of things to include.
The ideal system would have the same note number throughout the drawings for the same note, but would only contain the notes on a given sheet that apply to the work shown there. That note number would also contain the spec ID for the work involved. This automatically shows who is responsible and lets the keynotes become the specifications. An example would be "04810 - A: Modular face brick with Type S, concave tooled, mortar joints." There are times when a lengthy note describing an assembly of many discrete items of work is useful. This doesn't lend itself to keynoting. I suggest a General Note, and simply write it out. Another feature of the ideal keynote system is that you can save every note ever written in a kind of database for use on the next project. A checkbox includes it on this project. The applicable notes need to be on its drawing. It is inexcusable to force all the viewers of the drawings to flip back and forth or find them in a booklet. If they are on each sheet then they have to be limited to only the notes that are used. Meeting all these criteria gets complicated, particularly maintaining a database while using the database on more than one project at a time. But it is do-able. If your $4,000 CAD program (plus $800/year subscription) can't do this, you have to wonder, "Why not?". |


x
Archives
February 2024
Categories
All
|


Architekwiki | Architect's Resource | Greater Cincinnati
© 2012-2022 Architekwiki
© 2012-2022 Architekwiki